Selenium Grid( facilitates us with great feature of cross platform and cross browser testing. By using Selenium grid one can distributes test scripts on various machines with whole lot of browser and operating system combination at the same time and this feature helps in saving execution cost for automated scripts. Grid helps to initialise multiple instance of WebDriver/ RemoteWebDriver at the same time… In this tutorial we are going to learn about Selenium Grid 2 so we are not going to talk more about versions of Grid.
Benefit of Using Selenium Grid
1- It accelerate test execution time
2- Helps in cross browser testing with various version of same browser
3- Helps in cross platform testing
4- Code written on one machines can be used to run test on some other physical machines/ virtual machines
Selenium Grid is mainly made of Hub and Node.
Hub: It plays a role of co-ordinator and perform following task
1- It receives all the request from code triggered.
2- Get connected with node and distribute the triggered request to all nodes those are connected with hub.
3- It also manage the resource like which node is available and which one is not…and what combination of operating system and browser is present on any specific node.
4- If same combination of operating system and browser is available on multiple node then it uses round robin method to utilise the maximum resources available on these nodes.
Note: There is only one hub in selenium grid but can have multiple nodes.In normal scenario, Hub should be on same machine where Selenium WebDriver script is present.
Node: Node is the part of Selenium Grid where all test script get executed. In Selenium grid architecture one or more than one nodes are allowed.Node can also exist on the same machine where hub has been configured.
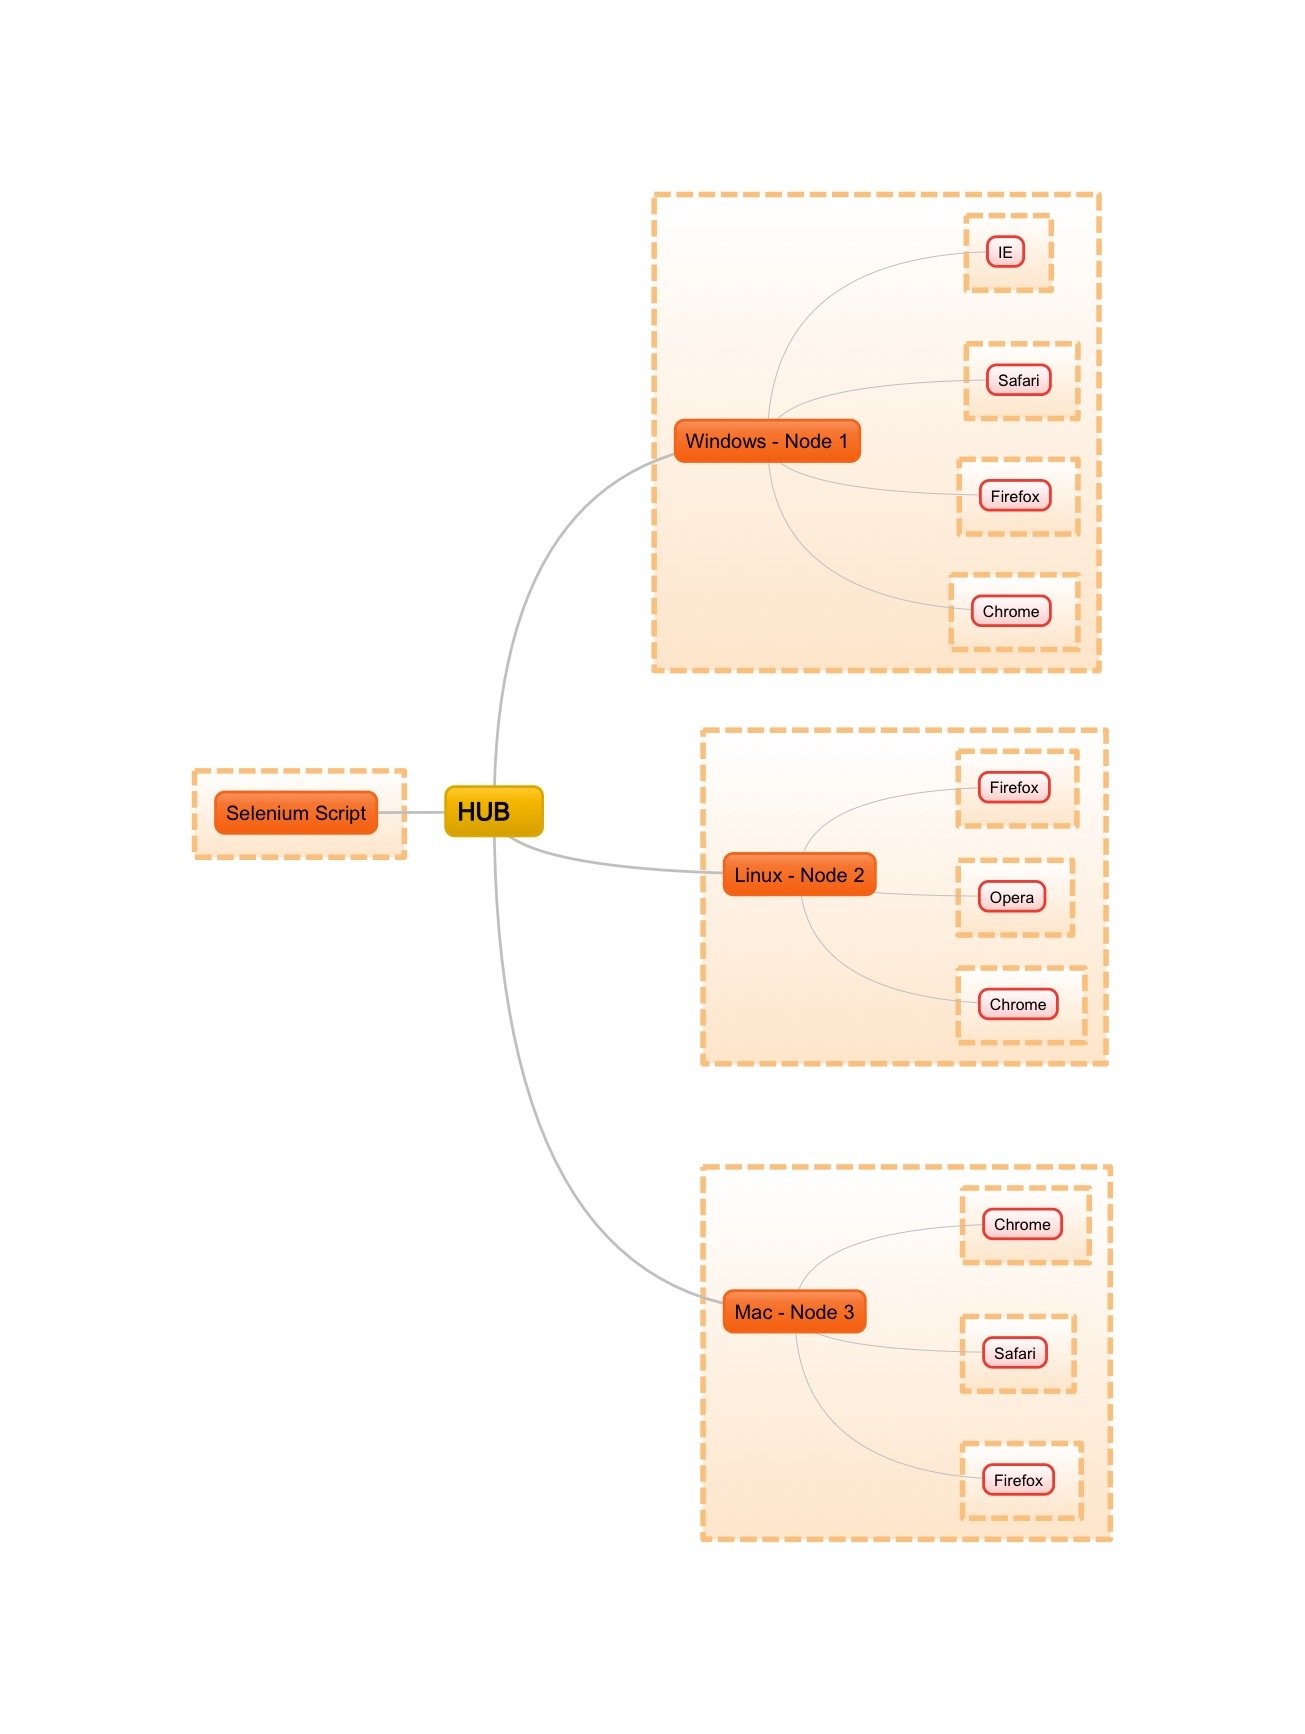
Architecture of Selenium Grid

Selenium Grid have these component at any point of time.
1- Selenium Script
2- Hub
3- Nodes(Like Windows, Linux, Mac and so on )
4- Application under test.
Steps to Setup hub and Nodes
1- Download Selenium server standalone jar from Seleniumhq. See in Image. But you need to download this jar file on all machines either it is hub or nodes.
 2- Open you cmd windows if you are on Windows machines/ terminal on Linux/Unix/Mac machines
3- Navigate to location where you have kept your standalone jar. Lets say in Mac machine it is in Downloads folder and in Windows you have kept this in D:/jar
So reach to these location you need to use CD command
For mac
2- Open you cmd windows if you are on Windows machines/ terminal on Linux/Unix/Mac machines
3- Navigate to location where you have kept your standalone jar. Lets say in Mac machine it is in Downloads folder and in Windows you have kept this in D:/jar
So reach to these location you need to use CD command
For mac
cd ~/DownloadsFor windows type
cd d:/jarSo probably you would be at location where you have kept your jar file... 4- Now type this command on you terminal/cmd window since we are in the same folder where selenium server standalone jar is present
java -jar selenium-server-standalone-2.48.2.jar -role hubonce you will hit enter after writing above lines<remember current version is 2.48.2 but might be it would be upgraded> Hub should get started and screen should look something like this
 Note: There are two way to set up node and hub
1- Command
2- json
In this post we are only going to talk about command. In coming post we will see json part as well.
5- Check whether hub is running or not. By opening following URL
http://localhost:4444/grid/console or http://<ip of yourmachine>:4444 since grid runs by default on port 4444 but if you want to change the default port then you need to use following command on your cmd/terminal in place of above command mentioned in step 4
Note: There are two way to set up node and hub
1- Command
2- json
In this post we are only going to talk about command. In coming post we will see json part as well.
5- Check whether hub is running or not. By opening following URL
http://localhost:4444/grid/console or http://<ip of yourmachine>:4444 since grid runs by default on port 4444 but if you want to change the default port then you need to use following command on your cmd/terminal in place of above command mentioned in step 4
java -jar selenium-server-standalone-2.48.2.jar -role hub -port <port num>If you are not sure about IP of your machine then use following command On Windows
ipconfigand go and see value of IP Address section in result and that would be your IP On Mac/Unix/Linux:
ifconfigtake the value after inet text as IP of your machine. But once you will run you Hub setup command mentioned in step 4 and 5 then you will see on line something like this
Nodes should register to http://machine-ip:4444/grid/register/So above can also tell you the IP to see the console. Hub console would look like this
 6- Check wether connection could be established from node or not by opening the grid console URL. http://192.168.0.103:4444/grid/console (As you can see that hub is running on this IP in image attached with step 4). If it is running then now its turn to register the nodes
7- Registering the node with hub.
a) Go to your node machine<Node could be on same hub machine or may be some other physical/virtual machine>
b) Navigate to location where selenium server standalone jar is kept
c) run following command (here we are going to register the node on some registration console that was visible on snapshot attached in step 4)
6- Check wether connection could be established from node or not by opening the grid console URL. http://192.168.0.103:4444/grid/console (As you can see that hub is running on this IP in image attached with step 4). If it is running then now its turn to register the nodes
7- Registering the node with hub.
a) Go to your node machine<Node could be on same hub machine or may be some other physical/virtual machine>
b) Navigate to location where selenium server standalone jar is kept
c) run following command (here we are going to register the node on some registration console that was visible on snapshot attached in step 4)
java -jar <Location of your selenium standalone jar> -role webdriver -hub http://ipofhubmachine:4444/grid/register -port <port number of node>So above could look something like this... if we go with hub ip i.e. 192.168.0.103
java -jar selenium-server-standalone-2.48.2.jar -role webdriver -hub http://192.168.0.103:5555/grid/register -port 5588So we have register node with hub on port 5588.Once node would be registered with hub it will show the message on terminal something like this
 8- Check that node has been registered or not. For this purpose again go and refresh the URL : http://192.168.0.103:4444/grid/console (Remember: 192.168.0.103 is hub machines ip). If node would have been registered than console would look like this.
It will show it IP of node and would also show the Operating system. and will show by default: 5 Firefox, 5 Chrome and 1 IE image that would look like this
8- Check that node has been registered or not. For this purpose again go and refresh the URL : http://192.168.0.103:4444/grid/console (Remember: 192.168.0.103 is hub machines ip). If node would have been registered than console would look like this.
It will show it IP of node and would also show the Operating system. and will show by default: 5 Firefox, 5 Chrome and 1 IE image that would look like this
 S o hope this has been helpful to you to set your hub and node. To read more about node also look in to Playing with node registration parameters.
Read Similar Posts
S o hope this has been helpful to you to set your hub and node. To read more about node also look in to Playing with node registration parameters.
Read Similar Posts


Leave a Reply