In the previous post, We have learned to install Ubuntu on VirtualBox. But what if you want to access your Ubuntu on VirtualBox.
So for this we need to perform some initial house keeping. First thing is installation of Putty if you are working on Windows. But if you are on Unix/Linux terminal then only thing you need to do is SSH this machine. Second Thing is to bring this virtual machine in network and this can be done by two ways.
- Network Address Translation (NAT)
- Bridged Networking.
What is Network Address Translation?
This is the easiest way of accessing network of host machine inside Virtual Machine. The best thing tagged with this setting is that nothing needs to be changed on host(Parent Machine Where VM is deployed) or guest (Operating System Installed on VirtualBox) machines. Due to this VirtualBox provides this network setting by default.
A VM enabled with NAT, acts like a real time computer which access internet/network through an router. Here Oracle VM VirtualBox networking engine acts as router and maps traffic to and fro transparently. This router works between host machine and VirtualBox. Due to this Virtual Machines doesn’t talk to other Virtual Machine. This is only because this router in between Virtual machine and Host Machine.
But there is one disadvantage which keeps this Virtual machine under a private network and this machine can’t be access from other machine outside this network and this is only possible through port forwarding.
Steps to do port forwarding in VirtualBox and Connecting Machine Using Putty.
1- Start your VirtualBox from the menu as we have learnt from previous post.
2- Navigate to Virtual Machine Created for Ubuntu
3- Right Click and Select Setting

4- Navigate to Network Option On Ubuntu Setting Window and Click and Again navigate to Adapter 1 (As in Snapshot)

5- Now Click on Advanced (As we can see in above Image). But before this ensure following detail
Enable Network Adapter is Checked as shown in above Image.
Attached To is having NAT Option Selected
If all above details are as shown in above image, Advanced option will look like this

6- Click on Port Forwarding Button shown under Advanced Section and On this click on + if there is no detail filled and enter following details as Port Forwarding Rules
Name : SSH
Protocol: TCP
Host IP: Keep Blank
Host Port: 2222
Guest IP: Keep Blank
Guest Port: 22
and Click on Ok Button.

But before moving ahead, Lets talk about leaving Host and Guest IP blank…
Leaving Host IP blank means it is pointing to localhost or 127.0.0.1 while in case of Guest, It will be the IP assigned to guest machine and this is done with intention that we never know when and what address will be assigned to machines.
7- Start your VirtualBox machine and wait for it’s booting and once it is done. Go and Open any of the browser and see your are able to access the home network internet which is used by host machine or not. If you are able to open any of the web page which you have entered in navigation bar of firefox. It means we are done with the changes correctly.
So what more we need to do to connect with this machine. Then let me tell you, You are going to access this machine either from another Unix/Linux machine or Using Putty using SSH. Then first thing we need to do is to install SSH Client on your Guest Operating system.
8- So go to your Ubuntu Machine and Open terminal and run this command
sudo apt-get install openssh-server

It will start reading openssh-server package and will start making dependency tree but once this will be It will ask you once question on screen
Do you want to continue? [Y/n]Then type Y and press Enter Button and wait to see next $ on screen
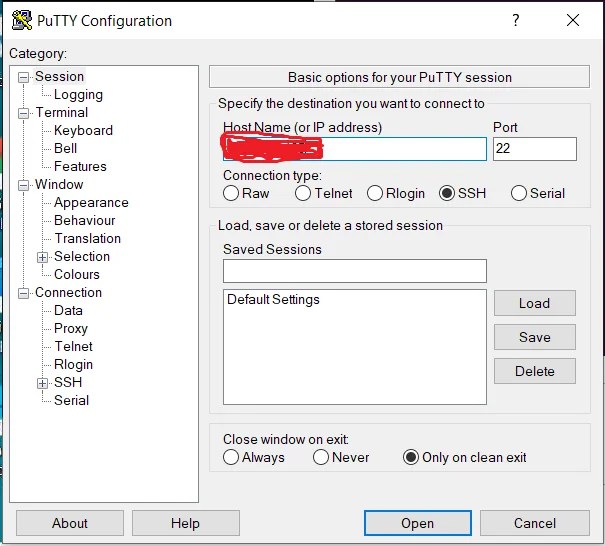
9- Now navigate to putty and type 127.0.0.1 as IP in putty and port as 2222 | or you can enter your host machines IP with 2222 port and Click on Open Button

It will open an black window with putty security alert window. Click on Yes.
10- Now only black screen remain open, Here enter your username and hit enter and enter your password and hit enter. It will connect you to your Virtual Machine(Ubuntu)

So till now we have seen how to use NAT to access Ubuntu Installed on VirtualBox and this was first way of network setting.
But How you will connect through your linux/Unix terminal.. So it is very easy navigate to your terminal and type this command and enter password.
ssh -p port username@127.0.0.1Once you will click enter button, It will ask the password of your linux password. Enter it and hit enter again, Now you are logged in to your linux machine. But lets make the ssh command complete with this example. In above paragraph, we have seen port as 2222 and username as computer. So complete ssh command will look like this
ssh -p 2222 computer@127.0.0.1So we are done with NAT. Now we have to see how to use bridged network.
Most of the steps will be same as NAT except the Network Attached To Setting. But before moving ahead let see basic introduction of Bridged Networking.
What is Bridged Networking?
With bridged networking, Oracle VM VirtualBox uses a device driver on your host system that filters data from your physical network adapter. This driver is therefore called a net filter driver. This enables Oracle VM VirtualBox to intercept data from the physical network and inject data into it, effectively creating a new network interface in software. When a guest is using such a new software interface, it looks to the host system as though the guest were physically connected to the interface using a network cable. The host can send data to the guest through that interface and receive data from it. This means that you can set up routing or bridging between the guest and the rest of your network.
Now we know what is bridged Networking used for in VirtualBox. Now lets see the setting steps because from Steps 7-10 will be same for both NAT and Bridged Networking.
1- Right Click on Ubuntu and Select Setting

2- Click on Network and Select Bridged Adapter Option from Attached To drop-down and Click on OK

3- Start Ubuntu and Follow the Steps 7-8 to install Open SSH Server on Ubuntu if doing it for the first time.
4- Now go to terminal and type ifconfig and select the IP shown with inet (This IP will be different for all or might be same in some cases so don’t type my IP)

5- Now Open Putty and Enter IP Show above with port 22. Like this and Click on Open and It will Open Putty Security Alert Window, Click on Yes.
6- Now Enter your Username and Click Enter and further enter password and Click Enter.
7- To ensure whether you are connected or not again type ifconfig on this terminal and match your IP and this should be same to the one which has been shown in step 4.
So we are done with our both ways of accessing VirtualBox Operating System using SSH.
Hope you have liked it. If this is helpful anyways then please share it with your friends or bookmark this post.
But what if you have installed some other version of linux on your machine… What will be your take in that situation. Don’t worry all above steps will work only in place of apt-get you need to use the command which is favourable to install openssh-server


Leave a Reply