Downloading and Configuring Selenium WebDriver in Eclipse
Steps:
- To Download Selenium WebDriver jar file Go to https://www.selenium.dev/downloads/
- Now Click on 3.141.59 under the label shown in Image

- Now Open Eclipse and Create one Java project

- Right Click on Left-hand side in Eclipse under Package Explorer like in Image

- Select NEW|JAVA PROJECT as marked in Image

- Enter the name of Project Here I have mentioned New Project and Click on Finish button

- Go to Project Explorer Label and See new project has been created as in Image
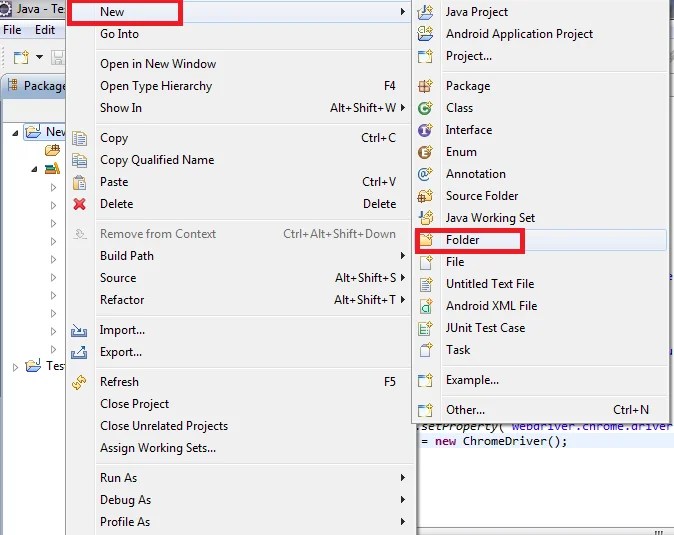
- Now Select your project and Select NEW|Folder as in Image


- Another Window Open Enter the name of Folder and Click on Finish as in Image

- Now go to Location where Java Client has been downloaded and Copy the Selenium Server
- Copy Selenium Server Standalone jar in Lib folder created under the new project

- Now add this standalone jar file into the path by doing Right Click on selenium-server-standalone-3.141.59.jar – Go to Build path|Add to Build Path as in the image
- Now you would see a new Label named as Reference Library as in Image

- By adding selenium-server-standalone-3.141.59.jar, we have configured Webdriver in Eclipse


Configuring TestNG in Eclipse

- In Eclipse go to Help|Install New Software
- Enter http://beust.com/eclipse in the field as displayed in the image below and click on Add Button on the right side of this text field, A pop up will appear, Enter the name TestNG and click on ok button and wait for few second. After this wait, you See TestNg and Select checkbox of TestNg and then click on Next and Follow the Instruction and finally click on Finish and Refresh Eclipse.

- Note: In between installation one pop alert will appear before you that will ask your permission to install TestNG since it is not trusted, In this click on the Ok button..wait for the installation of TestNg
- The question arises how we know that TestNg has been configured in Eclipse
Steps


- Go to Window | Show View | Other as in Image

- Now Select Java|TestNG|GO

- Finally to see whether Eclipse is configured or not do a final touch Right Click on you Peoject|Run As|TestNg Test as in Image


Finally, we are done with the configuration of Selenium WebDriver and TestNG In Eclipse.


Leave a Reply