Let us break the entire process of creating Fitnesse project in chunks and move ahead discussing each step in detail.
Step1: Java Project Creation
- First we create a new java Project.
- Click on
 (top left most side).
 - Select Java Project from the New Wizard.
- Click Next.
- New Java project window will open.
- Enter Project Name “Addition”.
- Remember to bullet mark the “create separate source and output folders” in project layout section.
- Click Finish. Take a look at the following project hierarchy:

Step2: Folder creation that will host the fitnesse wiki pages
- Right click the project “Addition”.
- Select New.
- Select folder.
- Give folder name: “Fitnesse”.
- Click finish.
Step3: Adding fitnesse libraries to project classpath
- Right click the project.
- Select FitNesse.
- Select “Add Fitnesse libraries to project classpath”. Libraries should be added to your project.
Step4: Launching FitNesse runtime on this root folder
- Right click the Fitnesse folder.
- Select FitNesse.
- Select “Launch FitNesse runtime on this root folder”.
- Fitnesse Launcher will appear.
- Click yes. Since the folder is empty we let the plug-in create the initial contents.
- Fitnesse screen will get open on local host. The project is ready for fitnesse based development.
Step5: Creating testpages with Fit table for addition
- Click on the edit to edit the page.
- Edit form will appear.
- Add a wiki word in camel back style that will point to a new page that will host the fit table. (write Link to a NewTestPage)
- Click save.
- Click on the question mark. The “?” mark means that the page does not exists yet. By clicking on the mark we will create and edit the page.
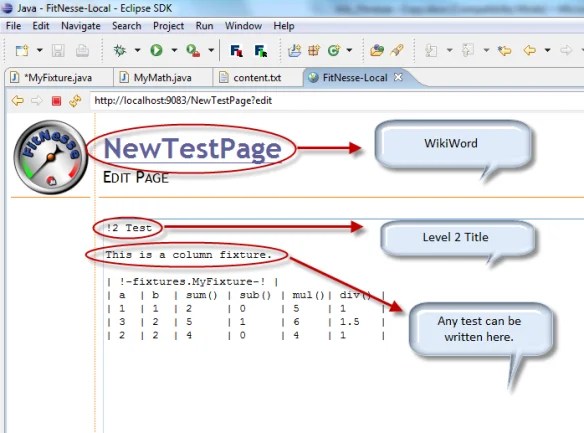
- We edit the page by adding level 2 title, some text and a table using column fixture. Each row has inputs (a and b) and output (sum()).
- Level 2 title can be: !2 Test
- Some text can be: This is a column Fixture.
- Create a fit table. For this refer the following figure:
Trending
- Save it.
- Now change the properties of the page by clicking on properties button on the left pane. Refer the following figure:

- Check test textbox.
- Click save properties. Refer the following figure:

Step6: Creating fixture that bridges the fit table semantics and the code to be tested.
- Right Click on src.
- Click on class to create a new fixture class.
- New Java Class window will appear.
- Enter package: “fixtures”.
- Enter name: “MyFixture”.
- Enter superclass: fit.ColumnFixture.
- Click finish.
- Write the following code in the fixture class:

Step7: Creating the actual system/ functionality under test
- Create a new java class with package name: “math”.
- Enter class name: “MyMath”.
- Click finish.
- Enter the following code whose behavior is tested according to what is specified in the fit table.

- Save both the classes.
Steps: Execute the test
- Run the test and check the result. Check out the following figure:
 Thus, the results can be analysed.
Hope this post turns out to be helpful for all those who want a quick start with Fitnesse.


Leave a Reply